You look at your website and have an idea.
“Let's redesign the homepage.”
“Let's change the navigation.”
“Let's shorten the Contact form.”
“Let's replace the main headline.”
“Let's move the call-to-action button.”
“Let's completely change the Services page.”
Maybe the idea is excellent.
But before making a major change, ask:
WHAT PROBLEM ARE WE TRYING TO SOLVE?
And:
HOW WILL WE KNOW WHETHER THE CHANGE HELPED?
That's where a website testing plan becomes useful.
Instead of:
IDEA → CHANGE EVERYTHING → HOPE IT WORKS
use:
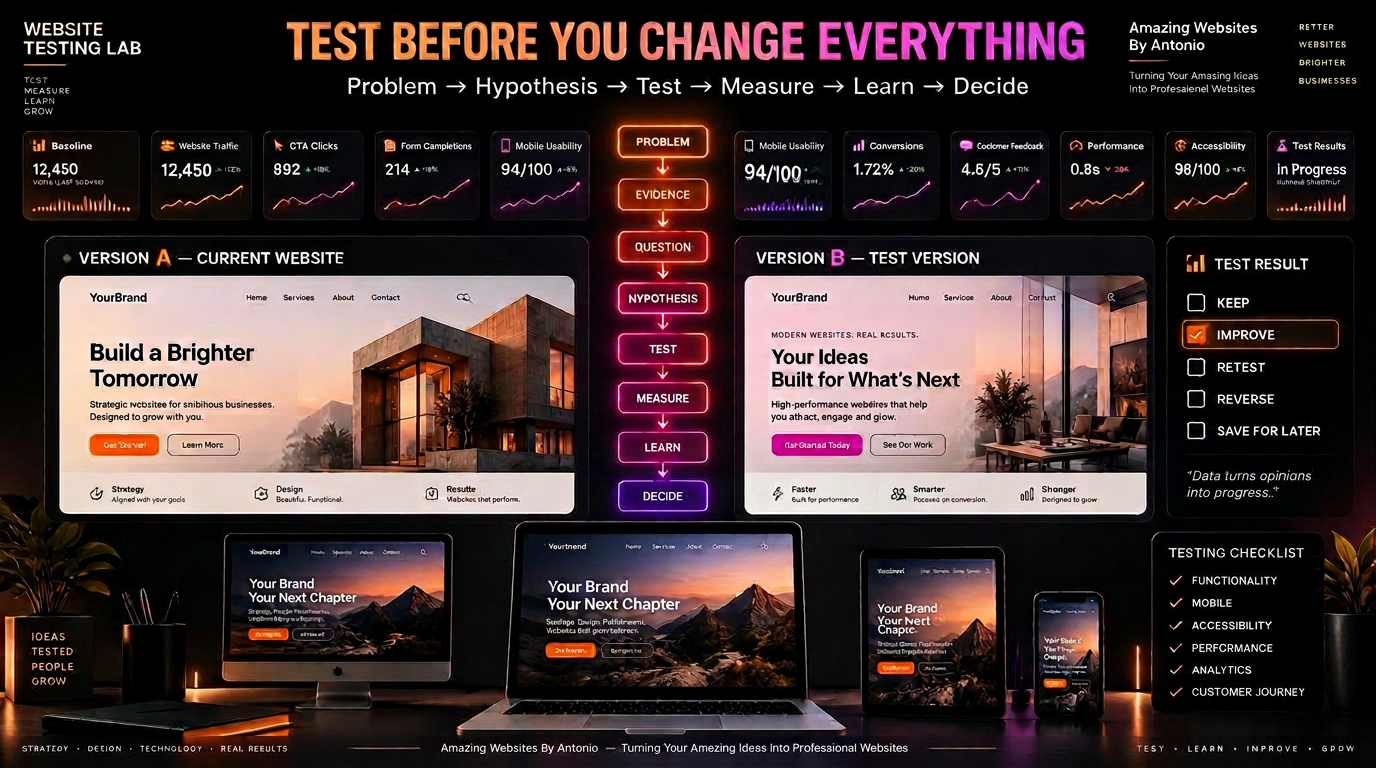
PROBLEM → QUESTION → HYPOTHESIS → TEST → MEASURE → LEARN → DECIDE
Let's build a website testing plan.
1. Start with the Problem
Don't begin with:
“I want a new homepage.”
Start with the problem.
For example:
- Visitors aren't finding our primary service.
- Our Contact form appears difficult to complete on mobile.
- Customers repeatedly ask questions already answered on the website.
- Visitors reach our Services page but don't know what to do next.
Define the problem before designing the solution.
2. Make the Problem Specific
Compare:
“Our website isn't working.”
with:
“Visitors frequently reach the Services page but few continue to the Contact page.”
The second statement gives you something to investigate.
Specific problems create better tests.
3. Use Evidence
Why do you believe the problem exists?
Possible evidence might include:
- Analytics
- Customer feedback
- User testing
- Form activity
- Search data
- Support questions
- Sales conversations
- Website errors
- Mobile testing
Avoid redesigning important parts of your website based only on a feeling.
4. Don't Assume the Data Explains Why
Analytics might show that something happened.
It doesn't always explain why.
For example:
DATA: Fewer mobile visitors complete a form.
Possible explanations:
- The form is too long.
- The button is difficult to use.
- The page loads slowly.
- Visitors don't trust the request.
- The offer isn't clear.
There could be several explanations.
Investigate before deciding.
5. Create a Question
Turn the problem into a question.
For example:
“Would simplifying the Contact form make it easier for mobile visitors to complete an inquiry?”
Now you have something testable.
6. Create a Hypothesis
A hypothesis is your prediction.
For example:
IF: We reduce unnecessary Contact-form fields...
THEN: More qualified visitors may complete the form...
BECAUSE: The inquiry process will require less effort.
This creates a clear reason for the change.
7. Define Your Goal
What should the test accomplish?
Examples:
- Improve form completion
- Help visitors find Services
- Increase appointment bookings
- Improve product discovery
- Increase relevant internal clicks
- Improve mobile usability
- Reduce confusion
Choose a goal connected to the original problem.
8. Choose the Right Metric
Your metric should match the goal.
If you're testing a Contact form:
Possible metric: Completed inquiries.
If you're testing navigation:
Possible metric: Visitors successfully reaching important pages.
If you're testing a service call to action:
Possible metric: Relevant CTA clicks or completed next steps.
Don't choose metrics simply because they're easy to measure.
9. Record Your Baseline
Before changing anything, understand current performance.
For example:
CURRENT CONTACT FORM
Visitors reaching form: 200 per month
Completed inquiries: 20
This gives you something to compare against later.
10. Define What Success Would Look Like
Before the test starts, ask:
What result would make this change worth keeping?
This doesn't always require an arbitrary percentage target.
Success could involve:
- More completed actions
- Fewer usability problems
- Better customer understanding
- Fewer support questions
- Improved accessibility
- Better performance
Define the intended outcome before seeing the result.
11. Choose What You're Testing
Be specific.
Instead of:
“Test the homepage.”
Try:
“Test a clearer homepage headline.”
Or:
“Test whether moving the primary call to action higher makes the next step easier to find.”
Specific tests are easier to understand.
12. Avoid Testing Everything at Once
Suppose you change:
- Headline.
- Images.
- Navigation.
- Buttons.
- Colors.
- Services.
- Contact form.
- Page structure.
Then inquiries increase.
Which change helped?
You don't know.
Focused testing can make learning easier.
13. Understand A/B Testing
A/B testing generally compares two versions of something.
VERSION A: Current experience.
VERSION B: Changed experience.
Visitors are divided between versions under an appropriate testing setup, and results are compared.
A/B testing can be useful when you have enough appropriate traffic and a suitable testing platform.
14. Know When A/B Testing May Not Be Practical
A small business website with limited traffic may not collect enough data quickly for a meaningful controlled experiment.
That doesn't mean you can't test.
You can still use:
- User testing
- Customer feedback
- Before-and-after analysis
- Task testing
- Usability reviews
- Form testing
- Device testing
Choose a method appropriate for your situation.
15. Use User Testing
Give someone a realistic task.
For example:
“Find the website-design service and tell me how you would start a project.”
Don't guide them.
Observe.
Where do they click?
Where do they hesitate?
What do they misunderstand?
What do they expect to happen?
Watching real behavior can reveal valuable insights.
16. Ask Better User-Testing Questions
Avoid:
“Do you like the website?”
Instead ask:
- “What do you think this business offers?”
- “Where would you go to start a project?”
- “What would you expect this button to do?”
- “Was anything difficult to find?”
- “What information would you want before contacting the business?”
Specific questions create more useful feedback.
17. Test Mobile Experiences
Don't test only on desktop.
If you're changing:
- Navigation.
- Forms.
- Buttons.
- Layout.
- Checkout.
- Booking.
Test on real mobile devices where practical.
A change that works beautifully on desktop may create problems on a smaller screen.
18. Test Accessibility
Website improvements should not make the experience harder for people with disabilities.
Review considerations such as:
- Keyboard navigation
- Focus visibility
- Color contrast
- Form labels
- Heading structure
- Alternative text
- Error messages
- Captions where applicable
Accessibility belongs inside the testing process.
19. Test Performance
A visually impressive new feature may create a slower website.
Before keeping it, review performance.
Consider:
- Images
- Video
- Animation
- Scripts
- Third-party tools
- New integrations
A new feature should not unnecessarily damage the experience.
20. Test for Technical Functionality
Before evaluating whether visitors like the change, make sure it actually works.
Test:
- Buttons
- Links
- Forms
- Checkout
- Booking
- Search
- Navigation
- Integrations
Functionality comes first.
21. Test Across Relevant Browsers
Major changes can behave differently depending on the browser.
Review important functionality across relevant browsers when practical.
22. Test Different Screen Sizes
Review:
- Desktop.
- Laptop.
- Tablet.
- Mobile.
Responsive design can change how content appears and behaves.
23. Create a Test Checklist
For example:
WEBSITE CHANGE TEST
- □ Desktop checked
- □ Mobile checked
- □ Tablet checked
- □ Navigation checked
- □ Links checked
- □ Forms checked
- □ Accessibility reviewed
- □ Performance reviewed
- □ Analytics tracking verified
- □ Customer journey reviewed
A repeatable checklist reduces forgotten steps.
24. Verify Your Analytics Before the Test
If you're using analytics to evaluate the change, make sure the relevant measurement works before beginning.
You don't want to discover afterward that the event or conversion wasn't being recorded.
25. Document the Original Version
Take screenshots.
Record copy.
Save relevant measurements.
Document the layout.
If you later need to compare or restore the previous version, you'll have a reference.
26. Create a Change Log
Record:
- DATE
- PAGE
- CHANGE
- REASON
- GOAL
- METRIC
- RESULT
- DECISION
Example:
DATE: October 5
PAGE: Contact
CHANGE: Reduced form from 12 fields to 6.
REASON: Mobile users appeared to struggle with completion.
GOAL: Simplify inquiries.
METRIC: Completed Contact forms.
RESULT: To be reviewed.
DECISION: Pending.
Now the test has a history.
27. Test the Complete Customer Journey
A change may improve one page while creating a problem somewhere else.
If you change a service page, test:
SERVICE ↓ PORTFOLIO ↓ CONTACT ↓ FORM ↓ CONFIRMATION
Make sure the full journey still works.
28. Don't Ignore Qualitative Feedback
Numbers matter.
But comments matter too.
Someone saying:
“I didn't know which service to choose.”
may reveal something that a chart cannot.
Combine QUANTITATIVE DATA with QUALITATIVE FEEDBACK.
29. Give the Test Enough Time
Don't make a change Monday and declare victory Tuesday.
You need enough information to evaluate the result appropriately.
The amount of time depends on:
- Website traffic
- Type of action
- Business cycle
- Conversion frequency
- Test method
Avoid making decisions from tiny samples.
30. Watch for Seasonal Effects
Suppose you test a sales page during your busiest month.
Sales increase.
Was it the page?
Or the season?
Consider outside factors when interpreting results.
31. Watch for Marketing Changes
Did you launch an advertising campaign during the test?
Send a large email?
Go viral on social media?
Receive press coverage?
These factors can affect website activity.
Document them.
32. Don't Change the Test Halfway Through
If you're testing one version, avoid repeatedly editing it during the evaluation period unless something is broken or harmful.
Constant changes make results harder to interpret.
33. Review the Result
At the end of the test, ask:
- What happened?
- Did the metric improve?
- Did it decline?
- Did it stay similar?
- Did customers respond differently?
- Were there unintended effects?
- What did we learn?
34. Compare Against the Original Goal
Don't judge the test based on something unrelated.
If your goal was: Improve Contact-form completion.
Don't declare the test successful simply because page views increased.
Evaluate the outcome you intended to influence.
35. Don't Force the Result You Wanted
Sometimes the new version won't perform better.
That's okay.
The purpose of testing is to learn—not to prove your idea was right.
36. Keep the Change When It Helps
If the evidence suggests the change improved the experience and supports your goals, keep it.
Then document the decision.
37. Revise and Test Again
Sometimes the idea is promising but needs improvement.
For example:
The shorter form helped... but customers now provide too little project information.
Next test: Keep the shorter form but improve one important question.
Testing can be iterative.
38. Reverse a Change When Necessary
Not every improvement is actually an improvement.
If a change creates problems, restoring the previous experience can be the right decision.
That's why documenting the original version matters.
39. Remember That “No Change” Is Still Information
Suppose Version B performs almost exactly like Version A.
You still learned something.
The change may not be important enough to justify additional complexity.
40. Don't Test Just to Test
Testing requires time.
Focus on meaningful questions.
Test things connected to:
- Customer problems
- Business goals
- Accessibility
- Usability
- Leads
- Sales
- Important content
- Customer journeys
41. Prioritize High-Impact Tests
Instead of testing the color of a tiny icon, you might learn more from testing:
- A confusing service message.
- A difficult Contact form.
- An unclear navigation structure.
- A weak call to action.
Prioritize what matters.
42. Create a Testing Backlog
Not every test needs to happen immediately.
Create:
- NOW
- NEXT
- LATER
- IDEAS
This connects your testing strategy with your website improvement roadmap.
43. Run One or a Few Focused Tests
Avoid overwhelming yourself.
For example:
THIS MONTH'S WEBSITE TESTS
- 1. Simplify Contact form.
- 2. Improve service-page call to action.
- 3. Test mobile navigation with users.
Focused testing makes learning manageable.
44. Share Results with Your Team or Client
Document:
- What was tested.
- Why.
- What happened.
- What you learned.
- What happens next.
This keeps decisions transparent.
45. Build a Testing Library
Over time, keep records of your experiments.
- TEST #1 — Homepage headline
- TEST #2 — Contact form
- TEST #3 — Service CTA
- TEST #4 — Mobile navigation
Your past tests become a valuable knowledge base.
46. Use AI Carefully in the Testing Process
AI can help:
- Generate hypotheses.
- Organize feedback.
- Suggest variations.
- Summarize observations.
- Create testing checklists.
But AI shouldn't decide automatically whether a website change is successful.
Use actual website results, customer feedback, and business judgment.
47. Protect Customer Privacy
If testing involves analytics, recordings, or other behavioral tools, understand what information is collected.
Configure tools appropriately.
Use consent mechanisms where required.
Maintain accurate privacy information.
Follow applicable requirements for your business and jurisdiction.
48. Turn Test Results into Roadmap Decisions
After testing, decide:
- KEEP
- IMPROVE
- RETEST
- REVERSE
- SAVE FOR LATER
Then update your website improvement roadmap.
49. Create a Repeatable Testing Framework
Use this process:
PROBLEM ↓ EVIDENCE ↓ QUESTION ↓ HYPOTHESIS ↓ GOAL ↓ METRIC ↓ TEST ↓ MEASURE ↓ LEARN ↓ DECIDE
Now testing becomes a process rather than guesswork.
50. Make Website Improvement a Learning Process
The goal isn't to create a website that never changes.
The goal is to make thoughtful changes.
Test. Learn. Improve. Measure. Repeat.
Over time, your website can become stronger because decisions are based on purpose rather than random redesigns.
Website Testing Plan Template
PROBLEM: ____________________________
EVIDENCE: ____________________________
QUESTION: ____________________________
HYPOTHESIS: ____________________________
GOAL: ____________________________
CURRENT BASELINE: ____________________________
CHANGE BEING TESTED: ____________________________
TESTING METHOD: ____________________________
PRIMARY METRIC: ____________________________
START DATE: ____________________________
REVIEW DATE: ____________________________
RESULT: ____________________________
WHAT WE LEARNED: ____________________________
DECISION: □ KEEP □ IMPROVE □ RETEST □ REVERSE □ SAVE FOR LATER
Final Thoughts
Website improvement shouldn't be:
GUESS → REDESIGN → HOPE.
It can be:
PROBLEM → EVIDENCE → QUESTION → TEST → MEASURE → LEARN → DECIDE.
You don't need to test every tiny detail.
You don't need a complicated laboratory.
And you don't need to chase perfection.
You need a clear problem. A thoughtful idea. A way to evaluate it. And a willingness to learn from the result.
Before making your next major website change, ask:
- What problem are we solving?
- What evidence do we have?
- What do we believe will help?
- How can we test it?
- How will we know what happened?
Then let the results help guide the next decision.
Because the best website changes aren't simply the newest ones.
They're the ones made with purpose.
Amazing Websites By Antonio
Turning Your Amazing Ideas Into Professional Websites